Deploy the browser extension
Plan, deploy, validate, and roll back the elba browser extension across managed browsers.
Before you begin
Use the Deployment Center in elba for the current configuration values, installation links, and downloadable artifacts for your workspace. Do not reuse identifiers, policy values, or scripts copied from another environment or an earlier rollout.
You will need:
- Access to Browser Security settings in elba.
- Administrative access to the browser or device-management platform you plan to use.
- A defined pilot group and target device scope.
- A communication plan for any users who must sign in or install manually.
Choose a deployment method
The methods shown in elba vary by browser and platform. Select a browser in the Deployment Center to see the options and exact values available for it.
| Method | Best suited to | What elba provides |
|---|---|---|
| Google Admin | Centrally managed Chrome environments | The values needed to add the extension and assign it to organizational units |
| Microsoft Intune | Managed Windows devices | The policy name, configuration location, and policy value |
| Group Policy | Active Directory-managed Windows devices | Browser extension policy values for the target computer policy |
| macOS MDM | Managed Chrome or Safari on macOS | Chrome preferences or a Safari declarative-management configuration |
| RMM | Script-based device administration | Standalone installation and rollback scripts |
| Manual | Pilots or users outside centralized management | The current installation link and extension information |
Standard rollout process
- In elba, open Browser Security settings and select the deployment view.
- Choose the target browser and deployment method.
- Copy the displayed values or download the provided artifacts.
- Apply them in your browser, device-management, or RMM platform.
- Assign the policy to the pilot group and trigger a policy refresh where appropriate.
- Restart or relaunch the browser if the management platform requires it.
- Confirm the policy and extension state on a pilot device.
- For Chrome and Edge, deploy the automatic sign-in policy described below. Otherwise, ask the pilot user to sign in to the extension.
- Verify the user's extension status in elba before expanding the assignment.
Sign users in automatically
Installing the extension does not connect it to elba: each browser still needs a signed-in user. For Chrome and Edge, the Deployment Center provides an extension policy that signs users in with your workspace's identity provider, so you don't have to ask every user to open the extension.
The policy names your elba workspace, your identity provider and, for Microsoft Entra ID, your tenant; for Okta, your Okta domain. It contains no credentials. The user's identity always comes from signing in to your identity provider, and the extension discards an automatic sign-in to any other elba workspace.
Chrome and Edge availability, checked 9 October 2026: Extension 0.6.0 is published in both stores. Automatic sign-in requires 0.5.0 or later; workstation coverage below requires 0.6.0 or later. Verify the installed version on each pilot browser before expanding a rollout.
With the policy in place, elba extension 0.5.0 and later:
- Signs in silently when the browser already has a session with your identity provider, for example an Edge profile signed in with the work account, Chrome with Microsoft single sign-on enabled through the
CloudAPAuthEnabledpolicy, or a browser already signed in to Microsoft 365 on the web. No page is shown. Google asks each user to approve elba once; until they have, Google Workspace users go through the sign-in page. - When the identity provider needs the user, for example for MFA, to choose between several accounts, or because no session exists, opens the elba sign-in page with your provider already selected. It opens once when the extension is installed, then after a failed automatic attempt at most once a day, up to 14 times, until the user signs in.
- Shows a badge on its toolbar icon while no one is signed in. The generated
ExtensionSettingsvalue pins the icon to the toolbar so users see the badge; in the Google Admin console, set the extension to Force install + pin to browser toolbar.
Without the policy, the extension still shows the badge and opens its sign-in page once, when it is installed.
Silent sign-in depends on your identity provider and browser configuration, so validate it on a pilot device before broad assignment. Conditional Access policies that require interaction for elba, and shared or multi-account browser profiles, lead to the sign-in page instead. The extension never blocks browsing while it waits for a sign-in.
To deploy the policy:
- In the Deployment Center, select Chrome or Edge and open Sign users in automatically. The values are prefilled for your workspace.
- Apply them with the tool you use for the installation policy:
- Microsoft Intune or RMM tools such as NinjaOne: run the downloaded PowerShell script as a device script. It writes the policy for every user of the device, from a 32-bit or 64-bit PowerShell host.
- Group Policy: import the registry file, or create the same registry values with Group Policy Preferences.
- Google Admin (Chrome): paste the JSON into the extension's Policy for extensions field.
- macOS MDM (Chrome): deploy the values under the managed preference domain shown.
- Relaunch the browser or wait for its policy refresh, then open
chrome://policyoredge://policyand confirm the elba extension policy showsidentityProvider. - Confirm in the deployment view that the pilot user appears as enrolled.
To roll back, run the downloaded removal script, which Intune can run as is, run the PowerShell script with -Remove, or delete the registry key. The extension then keeps its existing sessions and falls back to manual sign-in for new ones. Automatic sign-in is not available for Firefox or Safari, where users sign in from the extension.
Check Windows workstations and profiles
For Chrome and Edge 0.6.0 or later, Deployment can report dated activation for each expected workstation and professional browser profile. This requires a TPM-ready Windows device and an explicit connection from each profile; automatic sign-in alone does not establish workstation coverage.
- Open Managed Windows workstations → Register workstations. Enter the device reference and required Chrome, Edge and Firefox profile counts, one device per line, up to 200 per import. Use the same reference as NinjaOne. All-zero counts leave the required set unknown; a required Firefox profile remains an unsupported gap.
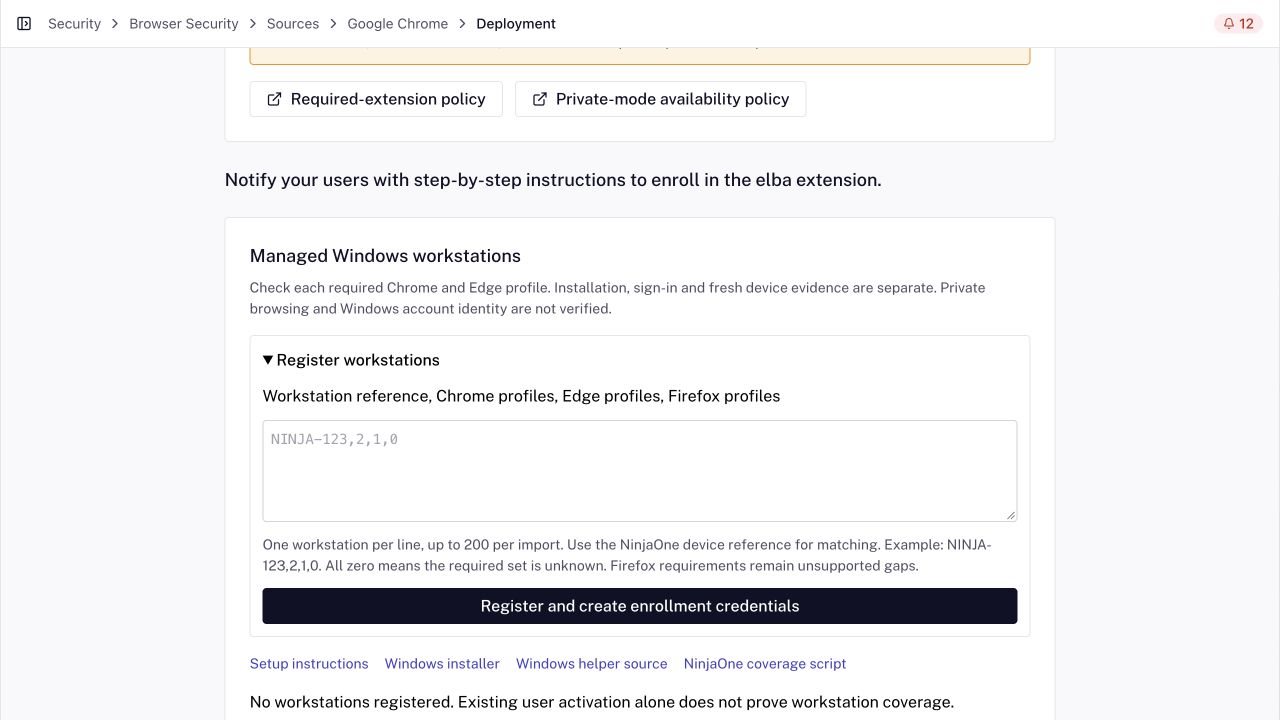
- Download Setup instructions, the Windows installer, the Windows helper source and the enrollment JSON created for your devices. Follow the downloaded instructions to run the installer through your approved RMM as administrator or SYSTEM. Match each record to its actual device. Each bootstrap is single-use and expires after 24 hours; keep it out of browser policy and never reuse it across a fleet.
- In each required Chrome or Edge profile, open elba, choose Connect this profile and approve the optional permission. Sign in if requested. The helper does not sign users in or inspect their browser-session storage.
- Put each device's read token in its own NinjaOne Secure custom field with script read permission. Run the downloaded NinjaOne coverage script through NinjaOne Automation as SYSTEM, following the setup instructions. It returns JSON: exit 0 means covered; exit 1 means a gap or unknown. After provisioning and saving the read token securely, delete the enrollment JSON. Alerts or blocking remain your separately configured policy.
- On an approved pilot device, compare the script's state, gaps and timestamps with Deployment. Check sign-out, restart, reconnection and stale evidence before expanding the rollout. An offline or inactive profile becomes stale within at most 12 hours; known sign-out or revocation invalidates it earlier.
The result proves possession of the operator-enrolled device key and an authenticated elba session. It does not prove the Windows account identity, continuous protection or private-window coverage. Follow the downloaded removal instructions when retiring or replacing a device.
Private and incognito browsing
Private-window coverage is separate from installing, force-installing, or enrolling the extension. The Deployment status in elba reports normal-mode enrollment and the existing heartbeat window only. It does not reveal browser private-mode settings, so an active heartbeat or Enrolled status is never proof of private-mode protection.
Use the browser-specific state below. Administrator setup required, Unobservable by elba, and Unsupported are different outcomes; do not interpret any of them as protected.
Chrome
- Current state — Administrator policy and user action required. On managed ChromeOS 114 or later,
MandatoryExtensionsForIncognitoNavigationcan prevent navigation until the user explicitly allows the Elba extension. The policy does not silently grant access, and desktop Chrome does not currently support this required-extension path. - Administrator action. On supported ChromeOS, add the Elba extension ID to the required-extension policy. Where consent cannot provide reliable coverage, disabling Incognito with IncognitoModeAvailability is a separate administrator choice.
- What elba can verify — Unobservable by elba. Validate policy and Incognito access on a managed pilot device.
Edge
- Current state — Administrator policy and user action required. On Edge 139 or later for Windows and macOS,
MandatoryExtensionsForInPrivateNavigationcan prevent navigation until the user explicitly allows the Elba extension. It does not silently grant access. - Administrator action. Add the Elba extension ID to the required-extension policy, or disable InPrivate separately with InPrivateModeAvailability.
- What elba can verify — Unobservable by elba. Validate policy and InPrivate access on a managed pilot device.
Firefox
- Current state — Managed policy available. Firefox 136 and Firefox ESR 128.8 or later support
"private_browsing": truein the extension'sExtensionSettingsentry. - Administrator action. Add the setting to the Elba extension entry using the Firefox ExtensionSettings policy. Disabling Private Browsing is a separate PrivateBrowsingModeAvailability choice.
- What elba can verify — Unobservable by elba. Validate the applied policy in
about:policieson a managed pilot device.
Safari
- Current state — Unsupported for the current Elba paths. The managed Elba declaration uses
PrivateBrowsing: AlwaysOff, and the manual validation path does not support Private Browsing. Apple's platform exposes a Safari extension-management control, but the current Elba deployment does not enable it. - Administrator action. Keep Private Browsing classified as unsupported. Do not change the generated Elba declaration or claim coverage from a standard-browsing installation.
- What elba can verify. There is no protected private-mode state to verify in the current Elba Safari paths.
Verify policy without changing a customer tenant
Test private-mode settings only on a representative device and policy assigned to your approved pilot scope. Elba does not apply, disable, or modify browser private-mode policy from the Deployment Center.
Method-specific guidance
Safari sign-in prerequisite
Google Workspace and Microsoft 365 sign-in use applications managed by elba. If your workspace uses Okta, update the existing Okta OIDC application before assigning Safari: keep https://login.eu.elba.security/auth-verify/okta and add https://login.eu.elba.security/api/oauth/extension/callback under Sign-in redirect URIs. The same Safari URI is displayed in the Deployment Center. Do not create a second Okta application or replace the existing client credentials.
Complete one Safari sign-in with a pilot user before broad MDM assignment. A package can be correctly signed and installed while the identity provider still rejects an unregistered redirect URI.
Google Admin
- Open the Chrome application and extension management area in Google Admin.
- Select the target organizational unit.
- Add the extension using the values displayed in elba.
- Set the installation policy for the target users or devices.
- Apply the optional advanced policy value only if it is part of your browser-management model.
- Refresh policy and validate the extension on a managed device.
Microsoft Intune
- Create or update the browser policy for the target Windows devices.
- Add the setting described in the elba Deployment Center.
- Paste the generated name, configuration location, and value exactly as displayed.
- Assign the policy to the pilot device group and trigger a sync.
- Confirm that the browser reports the policy and installs the extension.
Group Policy
- Open Group Policy Management and edit the target computer policy.
- Apply the browser extension policy values generated by elba.
- Preserve existing settings for other managed extensions when merging policy values.
- Wait for the normal policy refresh or trigger one according to your standard process.
- Relaunch the browser and validate the resulting policy state.
macOS MDM
For Chrome, create a macOS configuration profile using the managed preference domain and values displayed in elba.
For Safari 26 or later on macOS 26 or later:
Production Safari deployment is supported only through MDM. The host app has no built-in updater, so MDM must deploy every newly approved signed package version.
The Deployment Center shows both the latest pilot-download alias and the approved immutable elba-<version>.pkg URL. Pin the immutable URL in the MDM application record, verify it against the published SHA-256 checksum linked from the Deployment Center, and update the pinned URL deliberately for each approved rollout.
- Download and deploy the signed, notarized elba Safari package shown in the Deployment Center. The package installs the host application and embedded Safari extension in
/Applications. - Confirm that the host application is installed before assigning the Safari declarations. Safari cannot apply settings for an extension that has not yet been registered by its host application.
- Create a user-channel declarative management configuration with type
com.apple.configuration.safari.extensions.settingsusing the configuration JSON displayed in elba. Use the exact managed extension identifier, including the Apple team identifier in parentheses. - In the same channel, create the displayed
com.apple.activation.simpledeclaration. ItsStandardConfigurationsvalue references the configuration from the previous step; the configuration does not apply without this activation. - Assign both declarations to the pilot Mac group and wait for device check-in.
- Confirm that the extension is registered, always enabled, allowed on all website domains, and disabled in Private Browsing. Ask the user to open the extension in Safari, select Sign in, and complete authentication in the dedicated Safari tab. The containing app installs and registers the extension but does not own the sign-in session.
The generated ServerToken values identify the exact configuration and activation revisions. If you customize declaration content, regenerate both JSON declarations and synchronize them together; do not retain a token from an earlier payload.
Do not rename, repackage, or modify the downloaded package. Doing so invalidates its code signature and notarization.
Verify the Apple publisher
The current notarized package is signed as Developer ID Installer: Antoine Berton
(96X3VZ626X). Confirm that the ten-character team ID is 96X3VZ626X and that the package passes
the published SHA-256 check before deployment. Do not deploy a package with a different publisher,
team ID, or checksum.
RMM
- Download the installation script from elba.
- Run it through your RMM platform with the administrative context required by that platform.
- Keep the downloaded script unchanged so its installation and verification behavior remains intact.
- Retain the matching rollback script with the deployment record.
- Review the script result and validate the extension on a pilot endpoint.
Manual installation
Use manual installation for a pilot or when centralized browser management is unavailable. Share the installation link shown in elba, then ask the user to install the extension and sign in. Track completion from the deployment view and send a reminder if needed.
For Safari, manual installation is limited to pilot validation and is not a supported production deployment. Ask the pilot user to download and run the notarized .pkg, open Elba Browser Extension once so macOS registers the embedded extension, then enable it in Safari > Settings > Extensions. The user must allow access to all websites for complete Browser Security coverage. After that, they open the Safari extension, select Sign in, and complete authentication in the dedicated Safari tab. The host app does not auto-update, so reinstall every approved package version for the duration of the pilot. Private Browsing remains unsupported for the managed and manual validation paths.
Validate the deployment
On each representative platform, confirm that:
- The browser's policy page shows the expected managed extension policy where applicable.
- On Safari, the host application and embedded extension have valid signatures and the extension appears in Safari's extension settings.
- The extension is installed and managed as intended.
- Existing policies for unrelated extensions remain intact.
- The user can open the extension and sign in successfully.
- The user's extension status appears correctly in elba.
- The Browser Security capabilities you intend to use behave as expected in your test scope.
If a status does not update immediately, refresh device policy, relaunch the browser, and confirm that the extension has an active connection to elba.
Roll back safely
Plan rollback before broad assignment.
- Remove or unassign the browser or device policy from the affected group.
- For Safari, remove the activation declaration first, then the declarative management configuration, before uninstalling the elba host application through your fleet-management workflow.
- For script-based deployment, use the matching rollback artifact supplied by elba.
- Remove only the elba extension entry when the policy also manages other extensions.
- Refresh policy and relaunch the browser.
- Confirm that the managed policy and extension state match the intended rollback outcome.
For product context, read Browser extension and Browser extension capabilities. For unresolved installation or sign-in issues, continue to Troubleshooting.